Fundamental Analysis
The Japanese yen remains under bearish pressure against the dollar as the market evaluates the Bank of Japan's stance following recent statements by Governor Ueda, who reiterated that monetary policy adjustments will be made cautiously. The lack of immediate changes keeps a wide interest rate differential versus the Federal Reserve, which has kept the pair at elevated levels despite recent corrections.
No high-impact macroeconomic data are scheduled for today, although traders remain attentive to potential statements from Bank of Japan officials and expectations ahead of the next Federal Reserve meeting. Any comment on monetary policy or currency intervention could trigger sudden volatility.
Technical Analysis
USDJPY | H4
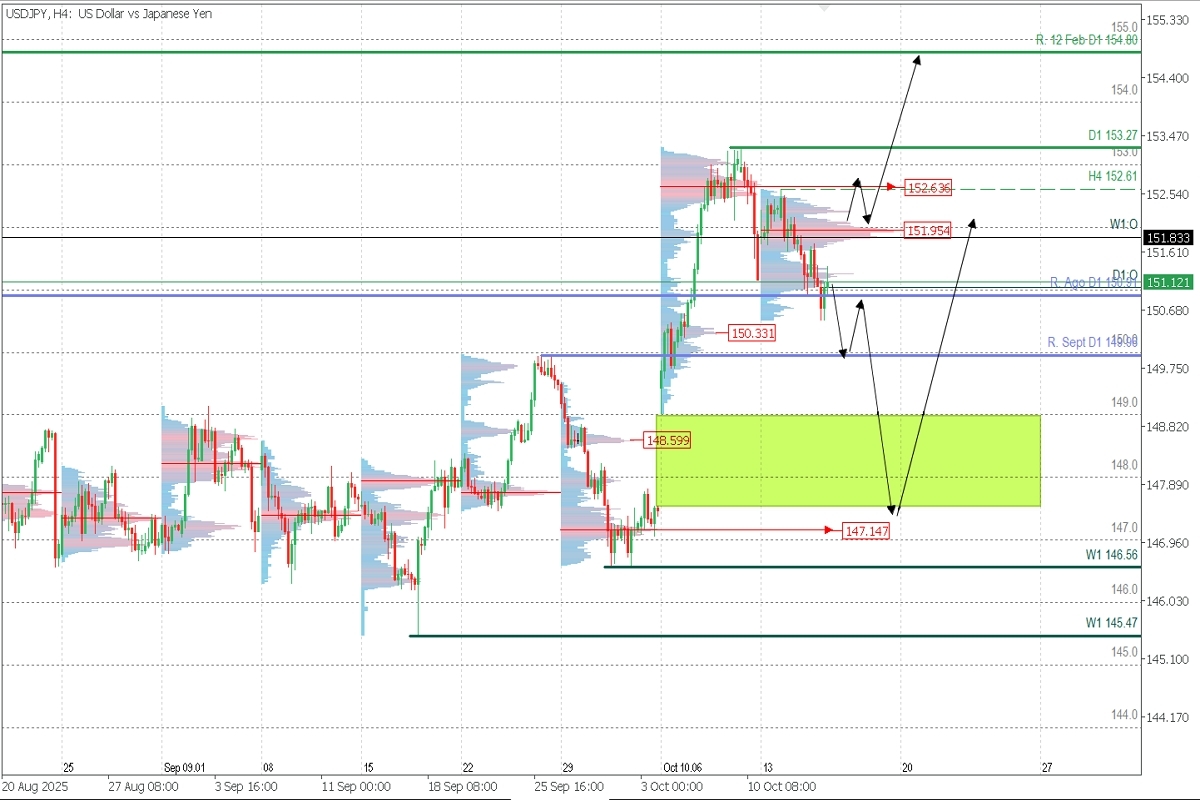
Supply Zones (Sell): 151.95 | 152.63
Demand Zones (Buy): 150.33 | 149.60 | 147.14
On the four-hour chart, USDJPY is in a corrective phase within the main uptrend after reaching a high of 153.27. The retracement has brought the price around 151.12, which coincides with the immediate base of a supply zone between 151.83 and 151.95, where the weekly open and current volume point of control converge.
This area acts as dynamic resistance, producing visible rejection in the latest candles. The next relevant technical support is at 150.33, followed by 148.59, both corresponding to previous points of control.
Main Scenario (Bearish Correction)
As long as the price remains below 151.83–151.95, the short-term bearish bias prevails. Continued rejection in this area could drive further declines toward 150.33, and a sustained close below that level would open the path toward 148.59 as the next value zone.
Alternative Scenario (Resumption of Uptrend)
If the price manages a sustained close and retest above 151.95, the bias would reverse upward, enabling advances toward 152.63 and 153.27. A confirmed break of the latter resistance would signal a resumption of the main trend, with a projection toward 154.80.
Exhaustion/Reversal Pattern (PAR): Before entering any trade in the key zones we indicated, always wait for the formation and confirmation of a PAR on M5, as we show here
POC Explained: POC = Point of Control: This is the level or zone with the highest volume concentration. If a bearish move followed it previously, it is considered a sell zone and forms resistance. Conversely, if a bullish impulse followed, it is viewed as a buy zone, usually at lows, forming support areas.